Installation Guide
Receiving Your BilgeAway Filter
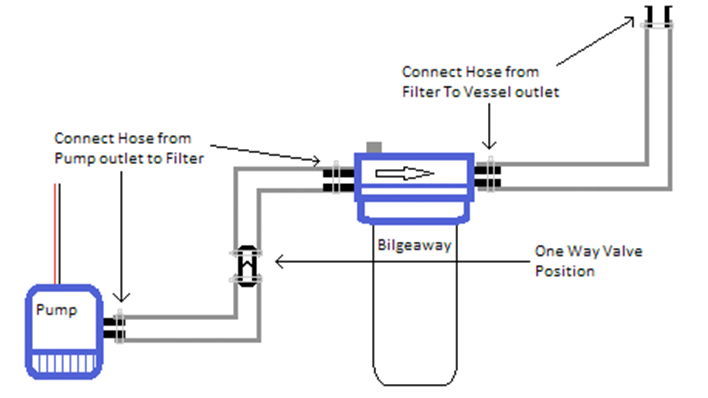
1: Standard installation for a vessel with just 1 pump (recomend up to 500GPH) and no emergency requirements
2: Installation for a vessel with a maintenance pump (up to 500GPH) and an emergency pump (Safest system for coastal and offshore use and for installations with higher pump specs)
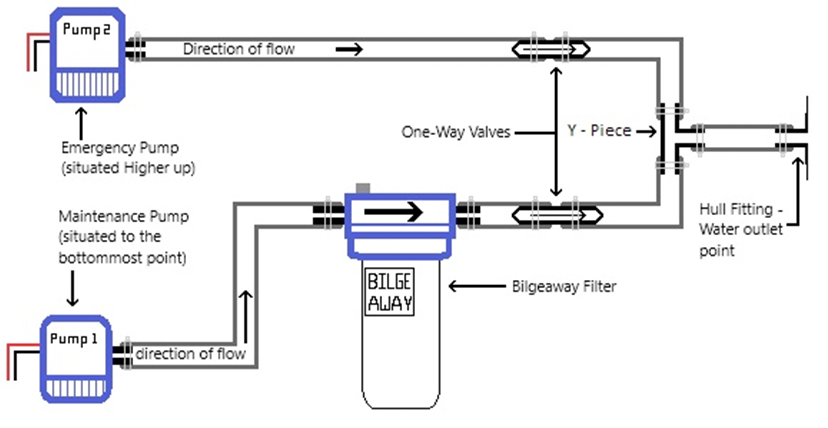
Please note – This is the correct system that should be installed on a vessel (but with a bilge filter included). Any coastal or offshore vessel should have a small maintenance pump and a large emergency pump installed. If only one pump is installed, the risk to vessel safety is increased dramatically.
Step 1 – Fit Hose-tails
Fit hose-tails into the two threaded horizontal openings on the filter head. Ensure that PTFE tape is used to ensure a good seal is created.
Step 2 – Mount Bracket
Locate an appropriate location for mounting the BilgeAway filter bracket. Ensure the following;
The chosen location is free from conflicting equipment. Conflicting equipment may include exhausts, bleed points, equipment requiring regular maintenance, and any moving parts.
Ensure the location is large enough to mount the filter and allow maintenance to occur.
Ensure the location is easily accessed and that the filter does not restrict access to other important areas.
Once an appropriate location has been identified, the bracket needs securing to a vertical surface. This is most easily achieved by gluing a small piece of wood to the surface first. This will then allow the bracket to be screwed into position without damaging the vessel. (ensure the wood is thick enough to screw into and use a strong exterior adhesive).
Ensure the BilgeAway filter mounting bracket is fixed in a position which allows the filter to be installed in an upright position (with the filter bowl extending downwards) and with enough room to install the Filter unit underneath (with enough room to enable maintenance).
Ensure the BilgeAway filter mounting bracket is able to utilise the existing bilge pump hose. If this is not possible, ensure suitable replacement hose is purchased before installation.
Step 3 – Install the filter
Using 4 screws, fix the filter head to the underside of the mounting bracket. Ensure the screws are fixed into the 4 circular holes, that line up with the fixing positions on the mounting bracket.
Ensure the directional arrows point in the correct direction (towards the bilge outlet point and away from the bilge pump). If the filter is fitted the wrong way around, it will hinder the efficiency of the filter. It will however, work regardless of the installation.
Step 4 – Fitting Hoses and Valves
It is advisable to fit a one-way valve between the bilge pump and the BilgeAway filter. It is not needed, but its use will increase the effectiveness of the system.
Connect the first hose to the outlet pipe on the bilge pump and connect the other end of this hose to the BilgeAway filter hose-tail point, marked with an arrow pointing towards the filter. Ensure this hose is fixed securely with jubilee clips at both ends. If a one-way valve is being used, it should be installed centrally into this hose (again ensuring it is securely fixed with jubilee clips).
Connect the second hose to the BilgeAway hose-tail point, marked with an arrow pointing away from the filter and connect the other end of this hose to the outlet point on the vessel. Ensure this hose is securely fixed with jubilee clips at both ends.
Step 5 – Testing
Turn on the bilge pump and ensure water is seen exiting the vessel. Check for leaks around the filter and hoses.
If water is not seen being discharged from the vessel, ensure the one-way valve is fitted the correct way around. Then whilst the pump is on, compress the small bleed point situated on the top of the filter, until water is present. Re-check the outlet to see water being discharged.
If the system continues failing to discharge water, contact the BilgeAway team for more advise.
Warranty
This Product is warranted to be free from defects in materials or workmanship when used as directed, for a period of 3 years. This warranty starts upon delivery of the product.
This product is classified as the BilgeAway filter and BilgeAway cartridge.
BilgeAway shall replace, or refund the purchase price of, any products proven to be defective within the 3-year period, so long as the product has been used in accordance with the directions for use.
BilgeAway offers no warranty on consumables or attachments. Bilge pumps will contain their own manufacturer’s warranty.
Disclaimer
BilgeAway warrants BilgeAway products only. The transport, application, and installation of our products are beyond our control and therefore is the sole responsibility of the user and or installer.
BilgeAway advises that a secondary “Emergency” bilge pump be installed, 4 inches higher than the BilgeAway system pump